AssistivTunnel
AssistivTunnel is a small command line interface (CLI) that creates a secure connection between your computer and virtual machines or mobile devices running in Assistiv Labs, which enables you to test…
- Any site or server running on
localhost - Internal staging servers that may require VPN
- Geofenced sites that only accept requests from certain countries or IPs
- Share files between your computer and the remote
Installing
Download the CLI for your platform from your terminal or command prompt.
macOS
Open the Terminal app and copy/paste the below:
curl -L https://assistivlabs.com/cli/macos-arm64.zip -o mac.zip && \
  unzip mac.zip && \
  rm mac.zip && \
  ./AssistivTunnel --version && \
  echo 'Install complete!'
Note: if you are on an older Intel Mac, use
https://assistivlabs.com/cli/macos-x64.zipinstead. If you aren't sure which, run thearchcommand in your Terminal.
Windows
Open the PowerShell app and copy/paste the below:
$ErrorActionPreference = 'Stop'
$ProgressPreference = 'SilentlyContinue'
Invoke-WebRequest https://assistivlabs.com/cli/win-x64.zip -OutFile win.zip
Expand-Archive win.zip .
Remove-Item -Path win.zip
.\AssistivTunnel.exe --version
Write-Host 'Install complete!'
Note: if you are on a newer ARM PC, use
https://assistivlabs.com/cli/win-arm64.zipinstead.
Linux
Run the below command in your preferred terminal:
curl -L https://assistivlabs.com/cli/linux-x64.zip -o linux.zip && \
  unzip linux.zip && \
  rm linux.zip && \
  ./AssistivTunnel --version && \
  echo 'Install complete!'
Start testing
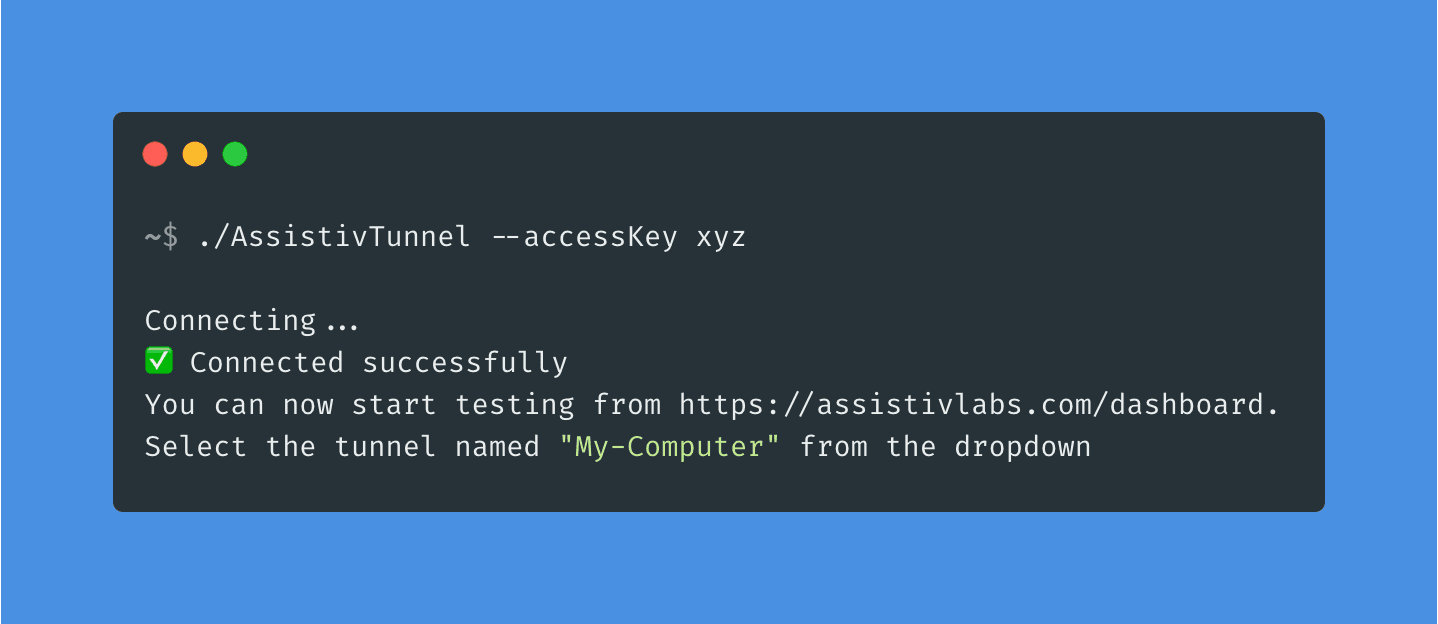
Return to https://assistivlabs.com/dashboard and run the command containing your personal AssistivTunnel accessKey.
Your terminal/command prompt will contain output similar to below:
> ./AssistivTunnel --accessKey <YOUR_ACCESS_KEY>
Connecting...
✅ Connected successfully
📁 File sharing: http://localhost:39949/share?token=0384f80b1143f517c91fb8bb4709ca32
You can now start testing from https://assistivlabs.com/dashboard.
Select the tunnel named "My-Computer" from the dropdown
You're now ready to test. Any URL that you can load locally will now work in Assistiv Labs. For example, paste https://localhost:3000 or https://staging.example.com into the remote browser.
File sharing

If you need to transfer files from your local computer (ex: PDFs) to be tested in Assistiv Labs, or export files that you've generated on an Assistiv Labs device back to your local computer, AssistivTunnel enables this feature by default. If you haven't already, follow the installation instructions above.
By default, AssistivTunnel creates a file share in your home directory (~/AssistivTunnel File Share on macOS/Linux) and makes it available to the remote device via a special URL. When you start AssistivTunnel, look for output similar to the following:
📁 File sharing: http://localhost:39949/share?token=0384f80b1143f517c91fb8bb4709ca32
Copy that URL and open it in the remote device's browser. It will display the contents of the AssistivTunnel File Share folder, and also let you upload files from the remote device to that folder.
File system access is limited to the file share folder. Use the --share flag to specify a different folder, or --no-share to disable sharing.
CLI options
Options:
      --help       Show help                                           [boolean]
      --accessKey  Your AssistivTunnel access key, obtain from
                   https://assistivlabs.com/settings                    [string]
      --label      Optional label for your tunnel to help you identify it on the
                   dashboard. If omitted, your computer's hostname will be used
                   instead                                              [string]
      --proxy      Optional, if your organization requires that you use a proxy
                   server to connect to the internet, specify it here with
                   "<host>:<port>". Ex: --proxy internalproxy.example.com:8080
                                                                        [string]
      --share      Enable file sharing for this directory. Defaults to
                   '~/AssistivTunnel File Share'. Use --no-share to disable.
                                                                        [string]
      --verbose    Enable verbose logging                              [boolean]
      --update     Check for updates                                   [boolean]
  -v, --version    Display AssistivTunnel's version                    [boolean]
      --cert       Optional, path to a self-signed CA certificate (.crt or .pem)
                                                                        [string]
FAQ
Is it secure?
Yes. AssistivTunnel uses TLS 1.2 end-to-end encryption for all communications. Traffic is not decrypted on our servers, it is only passed through. You can confirm this by visiting an HTTPS site in an Assistiv Labs browser and inspecting the connection certificate chain.
Only test devices in the Assistiv Labs cloud that you are actively testing can access your tunnel. Learn more about our security practices.
How does it work?
The AssistivTunnel CLI establishes a WSS (secure WebSocket) connection to our Relay server from your computer. When you start a test session from your Assistiv Labs dashboard and select an active tunnel, a new virtual machine or mobile device is provisioned and its network requests are routed through the Relay server over HTTPS. The network requests are then transmitted over WSS using a custom protocol to AssistivTunnel, which resolves the request and transmits the response over WSS back to the Relay.
When you end your test session, the test device and routing rule is deleted and all pending requests are cancelled.
A detailed whitepaper describing AssistivTunnel’s internals is available for security review upon request.
Can it be run centrally, from a DMZ or internal server?
Yes, if you only need to test internal websites with AssistivLabs (and not localhost) and would like to monitor the traffic moving through AssistivTunnel from a single access point, you can run AssistivTunnel from a DMZ or internal server. The tunnel can then be shared with everyone in your Assistiv Labs account.
Requires a Company plan. Contact us for more details.
Need help?
Contact us and we'll be happy to answer questions or walk you through the process.