ArticlesHow to start testing your websites and apps in screen readers
How to start testing your websites and apps in screen readers
November 16, 2022 by Matt Guay
Build it and they will come, they say, and you hope they mean everyone. No matter how focused an audience you’re targeting, deep down, you suspect almost anyone could benefit from what you’ve built. So you test your site in Chrome and Safari, pull it up on mobile and in-app browsers, and make sure everything works everywhere.
That still doesn’t cover everyone. You’ve got one more place to test your website or app before shipping: Screen readers.
Over 4.4 million people in the US alone—or nearly 1.4% of American internet users—regularly use screen readers. A WebAIM survey found that over 71% of screen reader users exclusively rely on audio to navigate their computers. If you extrapolate from those stats to your audience, odds are at least 1% of your users rely exclusively on a screen reader. That’s triple the number of people who use Internet Explorer or a third as many as use Firefox.
With less-popular browsers, you could say your app “works best in Chrome,” and call it a day. Not so with screen readers, when people with vision impairments rely on them. For them, if your website or app doesn’t work well with their chosen screen readers, it’s the same as if your app didn’t work well with screens for other users. No different than if the only thing that showed when you opened your app was a blank box. That’s why screen reader support is part of complying with the Americans with Disabilities Title III act and the European Accessibility Act.
Supporting screen readers is the right thing to do—and might be part of building a fully compliant website or app in your jurisdiction.
It’s not something you can outsource or automate away, either. There’s no automated test to verify that everything works intuitively when viewing your website or app with a screen reader. No one knows your product as well as you do. You need to run through it, by hand, testing your product the same way it’d be used by someone who relies on a screen reader, making sure everything sounds right and makes sense. You need to make accessibility testing part of your standard development workflow.
Here’s how to test your app or website on screen readers the way people who rely on screen readers use them.
How to use screen readers
- Start using the most popular screen reader software
- Navigate like a screen reader user
- By element type
- With a virtual cursor
- Using single letter navigation
- Test everything on your site or app
Start using a screen reader
Accessibility from a product development perspective, as defined by developer Joel Dodson, is “understanding and appreciating who your users are, how they might interact with your product based on their current abilities, then using that understanding to guide the user experience design and user interface development.”
You know your core audience, the people who are most likely to use your product. 1% or more of them might have visual impairments and use screen readers; they’re a part of your audience you need to build for. Now: How do they interact with your product? Working through your app or website the same way they use it will help you uncover places where your product might fall short, so you can then design your user experience for all of your users.
First, you’ll need to start using screen readers. The easiest one to try is the one built into your computer. PCs come with Narrator, Macs with VoiceOver, Chromebooks with ChromeVox. If you’ve never used a screen reader before, read through its manual, start it up (Narrator: Windows + Ctrl + Enter. VoiceOver: Command + F5. ChromeVox: Ctrl + Alt + z), and try using it for a few minutes.
Try the basics. Screen readers rely on a command key to prefix their keyboard shortcuts, so they don’t interfer with those from other software. Windows Narrator uses Caps lock or Insert for what it calls the “Narrator command,” VoiceOver uses control + option for what it shortens to “VO” in documentation, and ChromeVox uses the search button with many of its commands. With that knowledge in hand, the keyboard shortcuts for Narrator, VoiceOver, and ChromeVox should start making sense.
But you’re still only scratching the surface. Built-in screen readers help many people get started—and they’re the only option on macOS and ChromeOS. On Windows, though, two other options are far more popular: NVDA, an increasingly popular open source screen reader used by nearly 38% of screen reader users surveyed by WebAIM, and JAWS, a commercial screen reader used by around 41%. They’re more customizable and flexible—and if you have to only test in one screen reader, these are the must-test tools. And there are mobile screen readers, built into iOS and Android devices, along with screen magnification and other accessibility tools (here’s a demo of many of them to get a quick feel for how they work).
You shouldn’t only test a single screen reader, though, just as you shouldn’t test in a single browser. You should also either install both NVDA and JAWS on your computer or a virtual machine, or use a testing platform like Assistiv to run NVDA, Narrator, and JAWS all from your browser, and test your site or app in all three.
Navigate like a screen reader user
Then, you should start using the screen readers the way real people use them every day.
The first time you use a screen reader, odds are, you’ll quickly get overwhelmed by the computerized voice reading everything on the screen.
“Sighted people get intimidated watching experienced screen reader users parse through content,” shared developer and accessibility expert EJ Mason. “I think most people may not know that it’s possible to navigate by the types of elements on a page – like jumping between headings or between links – or even that it’s possible to change the rate of a screen reader’s speech.”
A sighted person might read a full page, top to bottom. They might quickly skim the page, glancing at headings and photos to decide what to read (say, skipping a story before a recipe). They might use their keyboard instead, pressing the spacebar to scroll down or tabbing through form fields to fill them faster.
Screen reader users also have different approaches to finding what they need on a page. They might navigate by element types to jump directly to headings and links, use a virtual cursor to move around and hear everything on a page, or move faster with keyboard shortcuts and single letter navigation to jump to buttons just by pressing b, say.
Browse by Element Types
The fastest way to get a feel for what a site or app offers is through its headings, buttons, and form fields. Picture your average signup page, with the app name in an H1 heading, an H2 saying “Get started with a new account”, form fields to enter your name and email, and a button to “Sign up.” You could read just the headings and know generally what’s going on, or skim the form fields to know what info is needed.
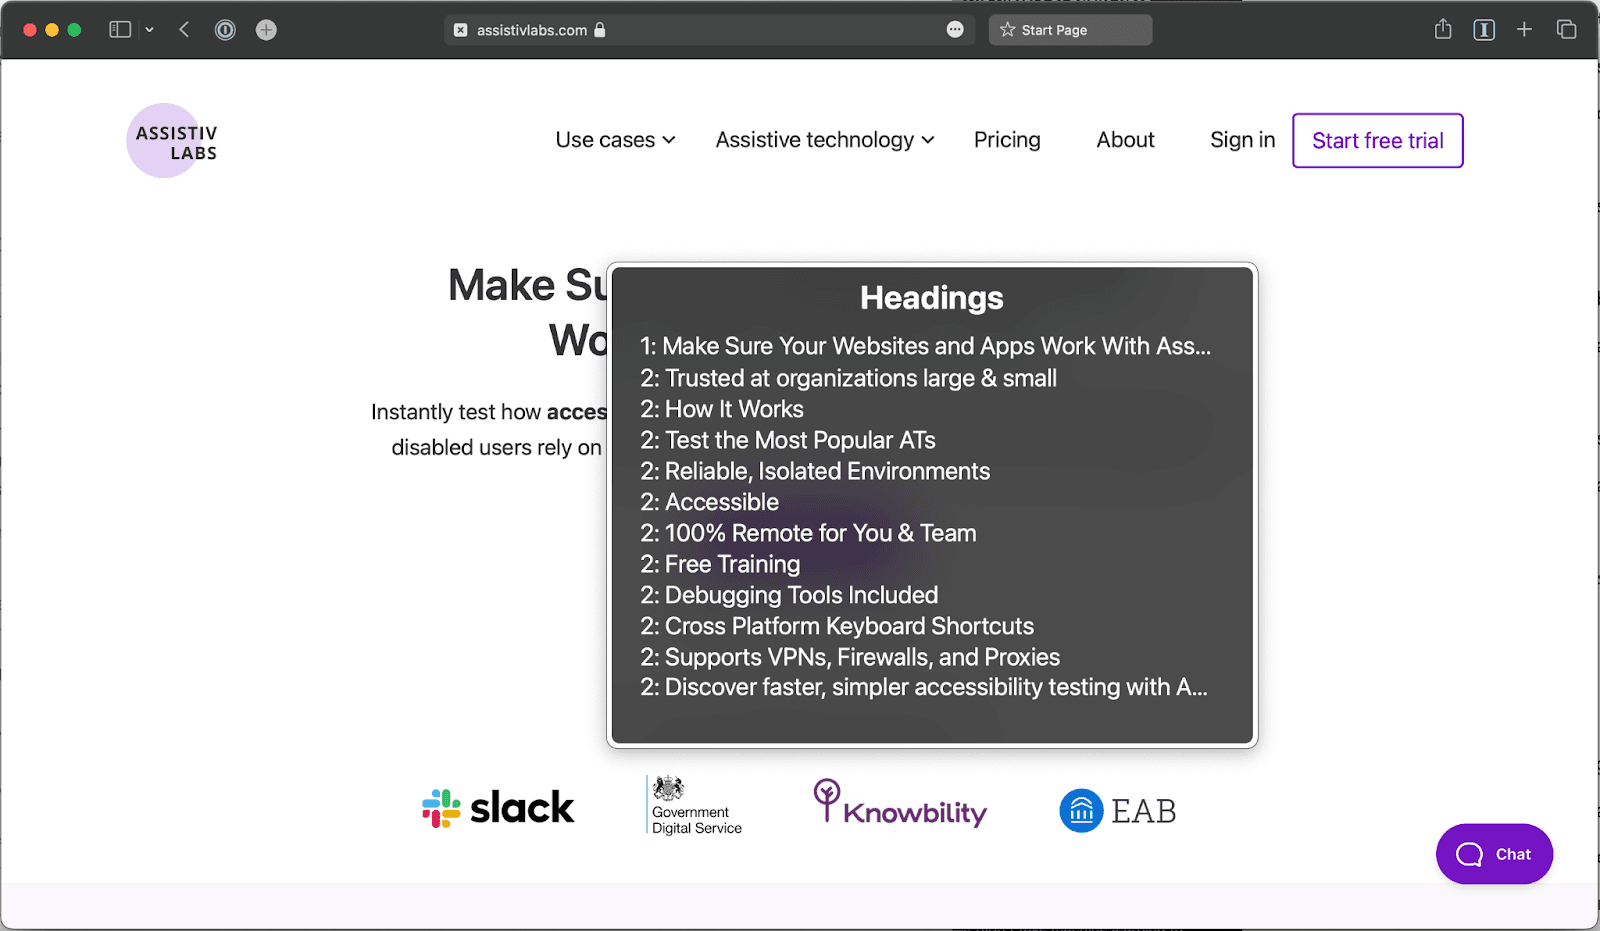
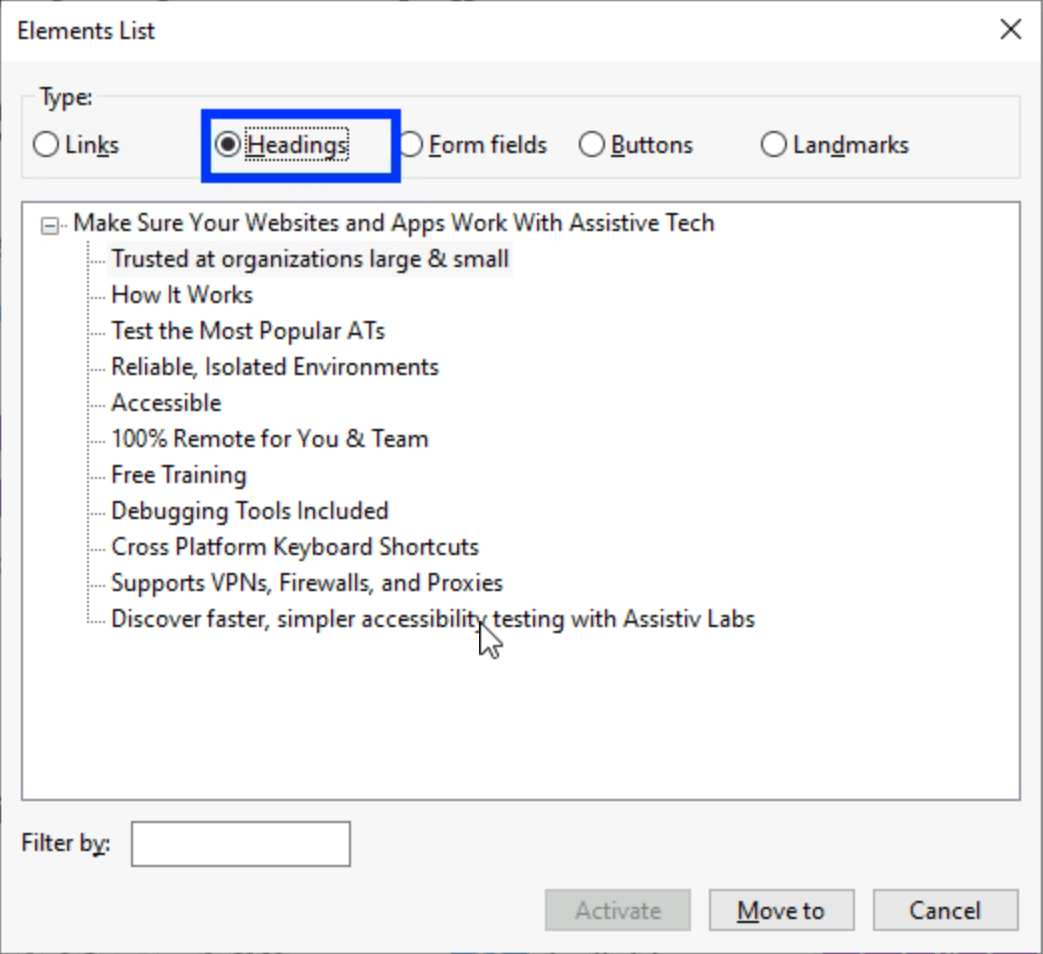
Screen readers can list each of the headings, form fields, links, and buttons so you can audibly skim the page.
“On a web page, the first things I scan are its headings and regions,” shares David Campos, blind software engineer and contributor to the NVDA open source project. He watches for forms and buttons, to build a mental map of the site. For desktop software, he goes through the menus to learn what the program offers. The question in mind, says David, is always “What routes should I take for some specific task?”
Screen readers will read each element in order—or show them in a visual list if you want a quick way to see if your site’s order makes sense. Are your headings listed in a logical order—or is anything a heading that shouldn’t be? Do links and buttons include enough text to make their actions clear without context clues? Have you added descriptive text to each form field? Is there anything—a button or menu, perhaps—that should show up but doesn’t, perhaps because it’s a standard div instead of the correct element? You’ll start noticing some of the first things to fix when navigating by elements.
Navigate with a Virtual Cursor
The more direct—but more cumbersome—way to use screen readers is the virtual cursor. When you first start using screen readers, you’ll likely tab around the page, and perhaps randomly press an arrow key and stumble upon the virtual cursor. It’s the closest thing screen reader users have to a mouse, a way to move through every element on a page.
Click anywhere in the page or app while your screen reader is running, and the element closest to where you clicked will be highlighted and read out loud. Press your up and down arrows to navigate between sections—and watch for what gets selected (left and right arrows will navigate horizontal lists, or read each character in a section, one after another, as a last-resort way to hear what’s written if your screen reader isn’t reading it well). If your page is ordered logically and designed to be responsive depending on your browser size, then your arrow keys should jump to the next logical sections. But sometimes things go wrong, and one down tap will jump you around seemingly at random—indicating that you’ve got work to do to organize your page sections well for screen readers.
Move faster with Single Letter Navigation
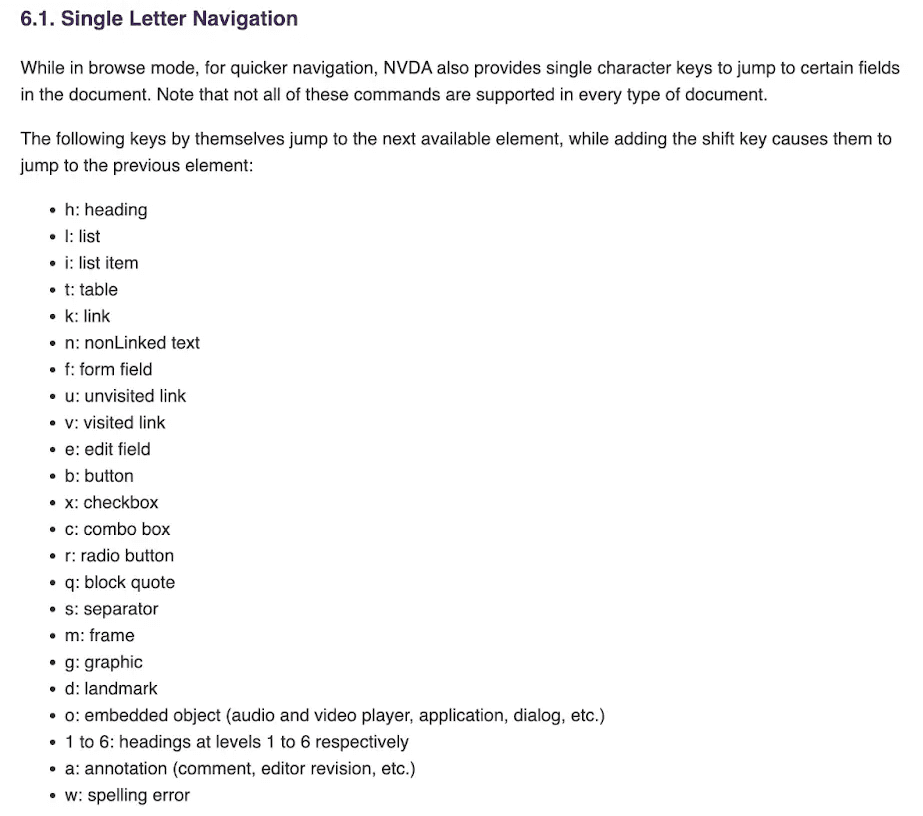
Then there’s the fastest way to use screen readers: Single letter navigation, using short keyboard shortcuts like h to jump to the next heading, u to the next unvisited link, b to the next button, and so on. They’re one of the core reasons to use NVDA or JAWS.
“The first thing I’ll do when I go to a site,” says Joel, “is I’ll type 1 to go to the H1 heading, and then I can just type h to go to the next heading.”
It’s a far faster way to jump around a site than the virtual cursor, or even browsing by elements. Once you’ve built a mental model of the site, you’ll know exactly which single letter to press and what to jump to. “A well-structured page, a blind person can navigate that potentially faster than a sighted person,” remarks Joel.
There’s a core thing to watch for when using single letter navigation, though: The modes. By default in single letter navigation, you’re in browse mode. Here, you’re moving around the app or site with your keys, so nothing you type will be read by the browser, page, or app—only by the screen reader. Your keyboard input is more like using a mouse, or perhaps like using keys to move around in a video game.
When you need to type and press enter or your space bar on a text field, you’ll switch to focus mode, which lets you enter text. It’s the screen reader equivalent of clicking on a text field, to start typing. Then, when you press tab, you’ll switch back to browse mode where you can resume moving around with single letter navigation.
Watch here for ways your app might interact with screen reader shortcuts. Make sure your app’s shortcuts work correctly in edit mode, and don’t interfere with browse mode. And use the shortcuts to check more of your site, to ensure links and more sound right.
Test everything.
With those skills in hand, you’re ready to get a feel for how screen reader users will experience your website or app.
“Spend an afternoon,” urges Joel. “Try it. It’ll help you understand how people use your site.”
And it’ll likely help you identify bugs and issues you should fix to make your site better, regardless of how it’s browsed. David, for example, mentioned that speed is often an issue with screen readers. “A few milliseconds may not seem like much to you, but if you sum each action that generates latency, using your application could be uncomfortable,” he says. Visually, you might be able to look at other parts of the site while it loads, or recognize a loading indicator. But when using a screen reader, you’ll have to re-scan the entire page each time to see what changes “The longer the user waits to hear the information, the longer it takes to complete a task,” says David, true for everyone but especially for those using screen readers.
You’ll find other things. Perhaps you’re used to tabbing through your site already or using keyboard shortcuts for your app. But do that with a screen reader, with single letter navigation. Close your eyes—or, better yet, use the A11y viewer to simulate how your site might feel to those with visual impairments—then check your headings and links, and make sure everything makes sense without other context clues. You’ll notice the stray Read more links that don’t make sense for someone hopping from one link to the next, and menus that are unreadable to screen readers (as Slack’s development team found, when testing their app with screen readers). Do it again, and check for the standard computer shortcuts that all power users rely on to navigate their computer from the keyboard. They’re little things, perhaps, but little things that are worth fixing to take your site from unusable to accessible for well over 1% of your users.
Then take it to the next level. Run through the Web Content Accessibility Guidelines—the W3C’s standard for building accessible websites—and check your website to ensure it covers the basics (which we’ve summarized for you in our Simplified guide to the Web Content Accessibility Guidelines).
And next time you ship changes, repeat the exercise. Fire up your screen reader, or jump into Assistiv, and navigate your app using only audio again. Make it part of your routine, get all of your developers onboard testing each new feature for accessibility, and you’ll be well on your way to having an accessible site ready for all of your users.